


Tutorial: Cyanotype on Linen - Photo Negatives

When I had my 20-week ultrasound, I knew I wanted to save my scan in a way that felt special to me. So, of course, I chose a fiber art that involved linen!
I finally put together a long awaited tutorial, and will walk you through how I edited my ultrasound + how to make black and white photo negatives to make sun prints using cyanotype solution on linen fabric!

I will be putting together cyanotype kits (linked here when they're live!) that include nearly everything you need to execute the tutorial below. The only thing not included is the piece of glass or acrylic you'll need to hold your negative down while your piece exposes in the sunlight. You'll also need a printer if you want to print your own negative, or you can choose to upload your photo & I will add a photo negative into your kit for you!
Alternatively, I am open to making custom linen cyanotype prints, and will share a link for that as well when the listing is live!
Now let's get into it!!
Supply list:
Cyanotype solution (you can find solution online or in most craft stores. Follow the mixing instructions on the kit you purchase!)
A small dish
A small brush
Linen fabric (Cotton fabric would probably work as well! But I have not tried that, so this tutorial will be specific to linen.)
Transparent printer paper (To create photo negative)
~5c Water
~10ml Hydrogen Peroxide (Optional; it helps develop the color more quickly.)
Something rigid to put your fabric on (cardboard works!)
Glass or Acrylic sheet to place over your photo negative
Clothespins (Optional)
Sunshine! (Alternatively, you can use a UV light. This tutorial follows the sunshine method!)
Step 1: Prepare your photo negative
I used Adobe Lightroom to make my photo negatives. It's pretty straight forward, you just flip the curve to the opposite corners (snippet below for reference) and then turn the saturation all the way down to make it black and white!

I did the same exact same thing with my ultrasound, but I also used the healing tool to "erase" any little white spots in my ultrasound that I didn't want to show up on my cyanotype print!
Once the negative is done, it's time to print! I use my Canon megatank printer and print directly onto transparent printer paper!
Using an application like Word, Numbers, or InDesign, insert your negative and choose the size you want your finished print to be (in this tutorial, I am using a 5x7 print).
Duplicate it so there are either two copies on one 8.5x11 sheet, or print two copies if you're making the finished print bigger!
Reference below for how I save mine as a double on a single 8.5x11 sheet. Save them as PDFs so they're more straightforward to print than a jpeg or photo file.
The reason for doubling the print is to layer them on top of each other and make the negative a bit more robust against the sunshine. If the black ink is too thin, it will allow sunlight through, and can make the print have less contrast.

Here is what my prints look like! Single & when they're doubled up. If doubling, tape the edge to keep the prints in place once they're lined up perfectly.

Step 2: Prepare your linen!
In a small cup, add equal parts cyanotype solutions A & B.
Note, keep your work area relatively dark and out of direct sunlight, or your solution will develop before you're ready!
Using a small brush, apply a hearty layer of the solution directly onto the linen. A little bit really does go a long way! It will look lime green - that is exactly what you want! You can cover the whole piece of linen, or you can make shapes! I made the ultrasound in the shape of a classic ultrasound!

Before you can make your print, the solution needs to dry completely. Once your linen is prepared, place it in a very dark area. I usually put the linen into an empty cardboard box and tape it shut!
I usually let it dry overnight, but as long as it is fully dry, you're good to go!
Step 3: Make your print sandwich!
Take your dry linen that has been prepped with cyanotype solution, and place it on a firm surface. A piece of cardboard works great!
Layer your photo negative on top, and place a glass or acrylic sheet on top of it. This will keep your photo negative directly against the fabric, and prevent any movement when you're putting it in the sun.

To keep it extra secure, clip clothespins around the edges holding the clear sheet to the cardboard, sandwiching the linen + print. (I didn't do this, so I don't have a photo of it. But if you do, just make sure your clips aren't blocking any of your print, or those parts won't expose!)
Step 4: Sunshine!!! (Expose Your Cyanotype)
Now time to expose your print! Put it in direct sunlight until the solution turns into a brassy grey color. The exact time really depends on how strong the sun is, so I can't give you a solid time. I put these in the sun for about 10 minutes.

(I redid this print with a longer exposer time, so that's the reason for the flip in the photo! Oops!)
Step 5: Rinse / Develop
Once it's done with its time in the sun, take the linen out from under the print, and put it directly into a small bowl with about 5c of water and 10ml of hydrogen peroxide.
Swish it around to rinse all of the remaining solution out of the fabric. You may need to dump the water and re-fill it a couple times until the water is left clear and you can't see anymore solution coming out of the fabric!
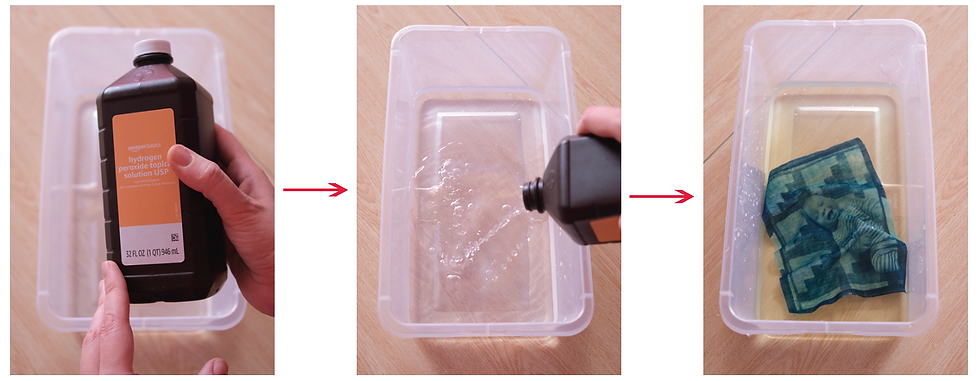
The peroxide is optional, it just helps the blue develop more quickly. You can use only water, it works exactly the same, it will just take a bit longer for the blue to fully oxidize into its final color!
Step 5: You're Done!!
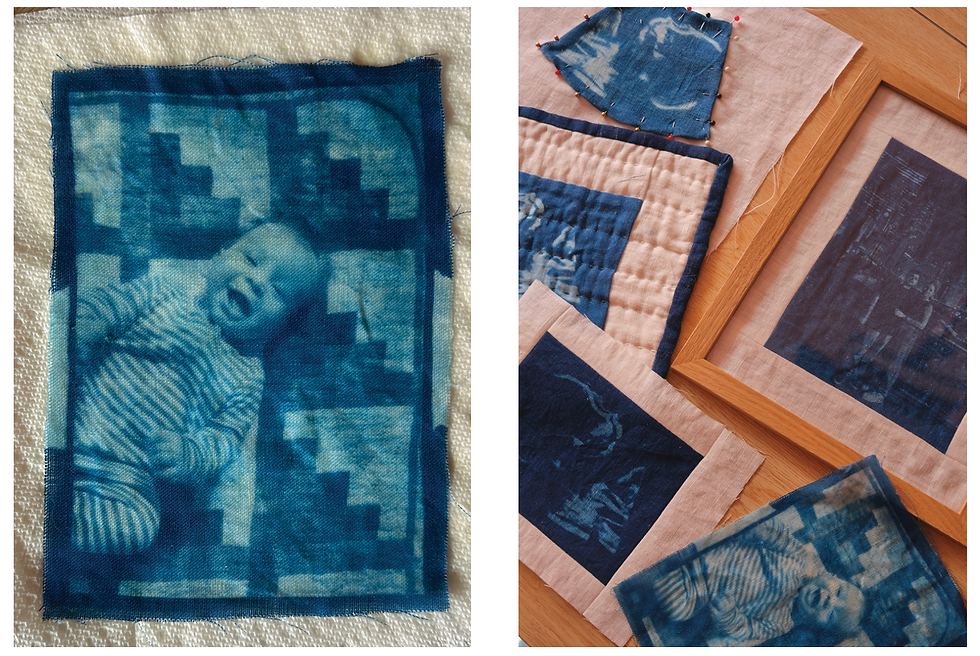
Now you have a photo print on linen fabric!
You can use the linen print lots of different ways! I've added a white border to some for a photo mat look, and put it in a frame. I quilted one of my ultrasounds, and I am using needle turn applique on one of my ultrasounds! The possibilities are endless.
If seeing the process helps you, there are videos on my social media linked below!
Instagram video: https://www.instagram.com/reel/DdxHlGEsDm_/?stkn=ZzBtZTZ1YTQ3YnBq TikTok video:

Comments